To all who want to follow my tutorials, you can download the original images and Photoshop PSD files here.
The files are archive using "RAR" format. You can download WinRAR archiver for free if you ever need one.
Tutorials and download links:
1. From A Snapshot To A Great Photo Tutorial
Download here (30MB).
PDF Format here (1.1MB)
Good luck and happy Photoshopping!
Showing posts with label Photoshop. Show all posts
Showing posts with label Photoshop. Show all posts
Friday, December 12, 2008
Tuesday, December 9, 2008
From A Snapshot To A Great Photo : Stage One
Taking pictures of people and places during street dancing festivals can be very colorful and fun.
We all get very excited clicking here and there, imagining how wonderful the costumes would come out in our pictures, how proud we would be of our prints, how exotic the dancers would look.
All the excitement and hopes soon fade away as soon as we get the prints- unfortunately. This is because we tend to get so caught up in the moment that
in most cases, all we have are snapshots.
Before anything else;
Some of the tools that I have used in this tutorial:
ScreenPrint32 - I used it for screen printing. You can download free for unlimited use on their website.
Rule of Thirds - An action script from PanosFX. Download file and unzip to a folder and rename it as Photoshop Action Script so you can locate it easily for later use. (Check my tutorial on the "Rule of Third" here using this script.
Photoshop shortcut keys:
Ctrl+Alt+Shift+E - Merge visible layers into a separate layer and place it on top of the layer pallete.
[ ]- Reduce or Maximize brush diameter.
Spacebar - Panning.
B - Brush
Ctrl+Shift+I - Inverse selection.
X - Foreground and background color toggle.
This is the original photo I took on the "Pintaflores" street dancing festival last November in San Carlos City Negros, Philippines. I really like this photo, a beautiful dancer with a great costume, an appropriate material for this tutorial.

Now let us take a moment to identify on how to improve this photo.
Exposure - Is a little bit underexposed on the subject's part. If I hadn't been too lazy, I could have snagged the shot. I was in a sort of dilemma at that time if I should bring my external flash. I opted for the beer instead (which is the right thing to do) so I can take pictures with a single hand.:)
Composition - Too centered for my taste and the guy on the left did not help with the overall balance.
Background - Very busy. I could have blurred the background with a shallower DoF but at that time it was blurred enough for me!hic....
The remaining enhancements will be for the next stage of this tutorial just so you'll come back for more.:)
Now let's roll out our sleeves and go to work!
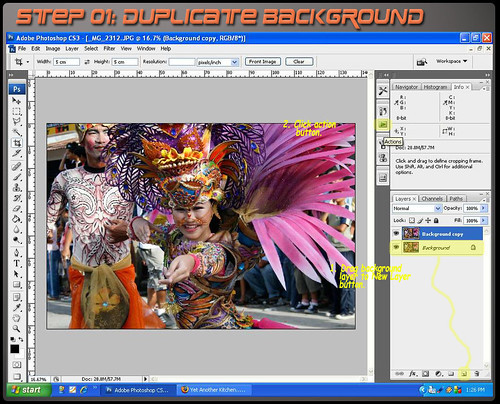
You can download a copy by clicking the image above for use in this tutorial only. Open your Photoshop and remember to duplicate the background by dragging the layer to "Create a new layer" button below the layer pallete or you can press/hold Ctrl+J keys.
Locate the file "Rule of Thirds Cropping" where you unzipped the action script by pressing the "Load Action" option.
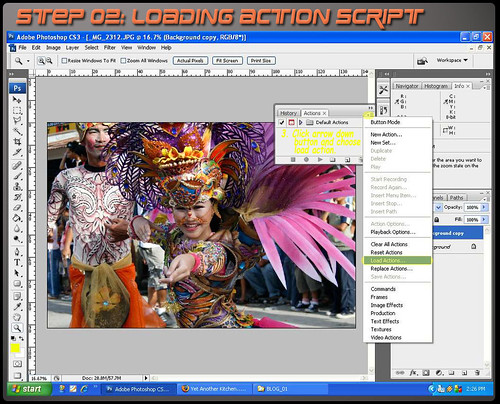
When loaded, highlight the script and press "Play Selection" and wait for the script to run completely until a yellow grid appears.

Rotate grid by click/drag mouse cursor just outside the yellow rectangle and resize by dragging transform toggles on corners and middle sections of the grid. (You can retain the image size ration by press/hold the "Shift" key at the same time.)
When done, read and follow the instructions until the action script is finished.

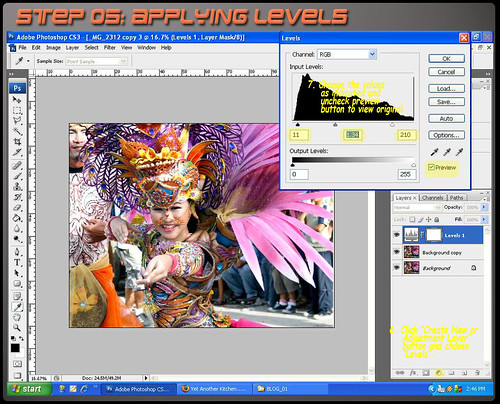
Adjust "Level" values as indicated focusing on the background. Check/Uncheck the preview check box to compare the effect. The purpose of this step is to minimize the effect of the background.
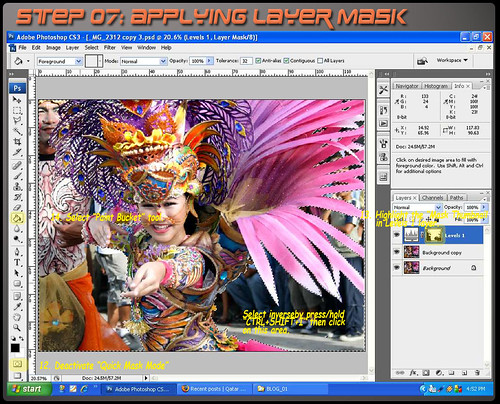
Carefully mask the background using brush in "Quick Mask Mode"and make sure that the foreground color is black.
Do not worry if you go beyond the edges. Just press "X" key to change the foreground to white and brush the excess to erase the mask. This should be a challenge on your masking skills specially on the headress part.

Deactivate "Quick Mask Mode" by clicking the button once. Automatically it will change into a selection. It is a good idea to save the selection by clicking "Select" tab and pick "Save Selection" option. Apply layer mask as shown below.
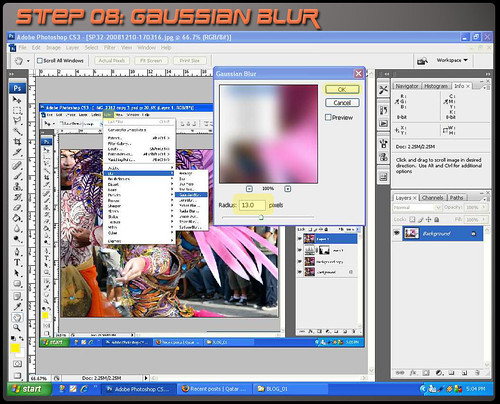
Merge layers by press/hold "Ctrl+Alt+Shit+E" into a separate layer. Then apply gaussian blur to further diminish the background making the subject stand out.
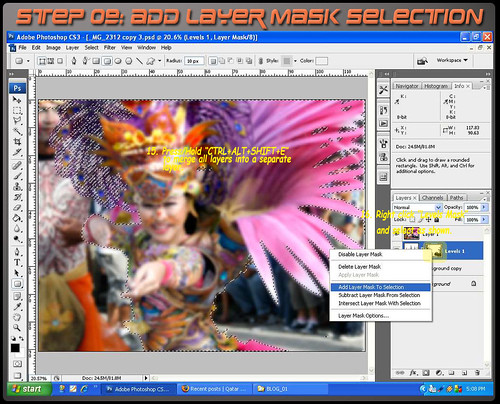
To isolate the effect only on the background, we will apply a layer mask. But first, right click on the "Levels" layer mask thumbnail and select "Add layer mask to selection", highlight the topmost layer and while pressing the "Shit" key, click "Add Vector Mask" at the bottom of the layers pallette.

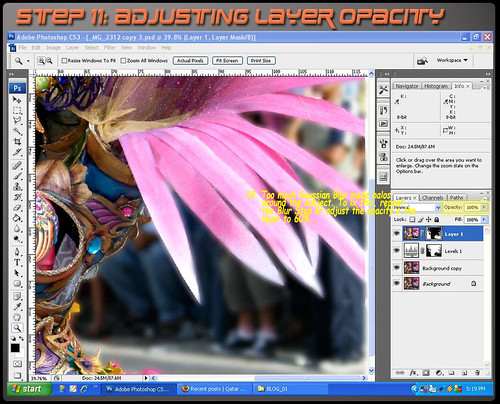
Too much blurring will produce halos at the edges. To fix that we will reduce the opacity of thelayer to minimize the blur effect.
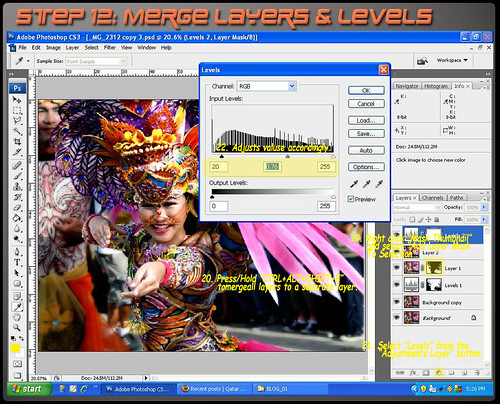
Merge layers, then darken the image by using "Levels" and apply a mask to restrict the effectonly on the background.
Apply "Curves" to enhance the contrast as shown.

There are many ways to sharpen an image. But for this tutorial, we will use the "High Pass" sharpening filter.

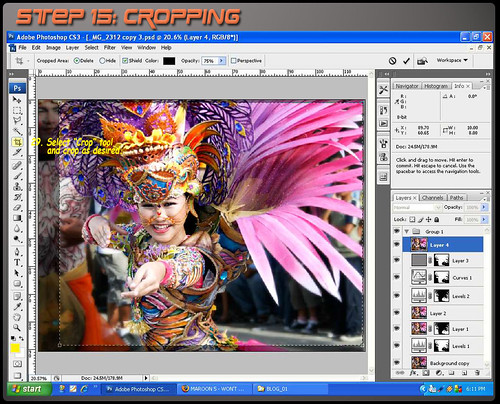
Finally, crop the image as desired. In my case, I prefer the 8 x 10 ratio.
And voila! We are done.

Stay tuned for the Stage Two of this tutorial. Ciao...
We all get very excited clicking here and there, imagining how wonderful the costumes would come out in our pictures, how proud we would be of our prints, how exotic the dancers would look.
All the excitement and hopes soon fade away as soon as we get the prints- unfortunately. This is because we tend to get so caught up in the moment that
in most cases, all we have are snapshots.
Before anything else;
Some of the tools that I have used in this tutorial:
ScreenPrint32 - I used it for screen printing. You can download free for unlimited use on their website.
Rule of Thirds - An action script from PanosFX. Download file and unzip to a folder and rename it as Photoshop Action Script so you can locate it easily for later use. (Check my tutorial on the "Rule of Third" here using this script.
Photoshop shortcut keys:
Ctrl+Alt+Shift+E - Merge visible layers into a separate layer and place it on top of the layer pallete.
[ ]- Reduce or Maximize brush diameter.
Spacebar - Panning.
B - Brush
Ctrl+Shift+I - Inverse selection.
X - Foreground and background color toggle.
This is the original photo I took on the "Pintaflores" street dancing festival last November in San Carlos City Negros, Philippines. I really like this photo, a beautiful dancer with a great costume, an appropriate material for this tutorial.
Now let us take a moment to identify on how to improve this photo.
Exposure - Is a little bit underexposed on the subject's part. If I hadn't been too lazy, I could have snagged the shot. I was in a sort of dilemma at that time if I should bring my external flash. I opted for the beer instead (which is the right thing to do) so I can take pictures with a single hand.:)
Composition - Too centered for my taste and the guy on the left did not help with the overall balance.
Background - Very busy. I could have blurred the background with a shallower DoF but at that time it was blurred enough for me!hic....
The remaining enhancements will be for the next stage of this tutorial just so you'll come back for more.:)
Now let's roll out our sleeves and go to work!
You can download a copy by clicking the image above for use in this tutorial only. Open your Photoshop and remember to duplicate the background by dragging the layer to "Create a new layer" button below the layer pallete or you can press/hold Ctrl+J keys.
Locate the file "Rule of Thirds Cropping" where you unzipped the action script by pressing the "Load Action" option.
When loaded, highlight the script and press "Play Selection" and wait for the script to run completely until a yellow grid appears.
Rotate grid by click/drag mouse cursor just outside the yellow rectangle and resize by dragging transform toggles on corners and middle sections of the grid. (You can retain the image size ration by press/hold the "Shift" key at the same time.)
When done, read and follow the instructions until the action script is finished.
Adjust "Level" values as indicated focusing on the background. Check/Uncheck the preview check box to compare the effect. The purpose of this step is to minimize the effect of the background.
Carefully mask the background using brush in "Quick Mask Mode"and make sure that the foreground color is black.
Do not worry if you go beyond the edges. Just press "X" key to change the foreground to white and brush the excess to erase the mask. This should be a challenge on your masking skills specially on the headress part.
Deactivate "Quick Mask Mode" by clicking the button once. Automatically it will change into a selection. It is a good idea to save the selection by clicking "Select" tab and pick "Save Selection" option. Apply layer mask as shown below.
Merge layers by press/hold "Ctrl+Alt+Shit+E" into a separate layer. Then apply gaussian blur to further diminish the background making the subject stand out.
To isolate the effect only on the background, we will apply a layer mask. But first, right click on the "Levels" layer mask thumbnail and select "Add layer mask to selection", highlight the topmost layer and while pressing the "Shit" key, click "Add Vector Mask" at the bottom of the layers pallette.
Too much blurring will produce halos at the edges. To fix that we will reduce the opacity of thelayer to minimize the blur effect.
Merge layers, then darken the image by using "Levels" and apply a mask to restrict the effectonly on the background.
Apply "Curves" to enhance the contrast as shown.
There are many ways to sharpen an image. But for this tutorial, we will use the "High Pass" sharpening filter.
Finally, crop the image as desired. In my case, I prefer the 8 x 10 ratio.
And voila! We are done.
Stay tuned for the Stage Two of this tutorial. Ciao...
Sunday, June 22, 2008
PHOTOSHOP : II. Simple Tutorial on " Making a Perfect Photo"
The saga continues....
Today, we will be making subtle retouching on the subject to make the perfect bride photo.
 We'll start on removing the blue cast on the veil. Select "Hue/Saturation" from the "Create New Fill or Adjustment Layer". On the Hue/Saturation dialog box "Edit" option, click the drop down menu and choose blue. Lower the "Saturation" by dragging the slider to the left or directly input -30 on the saturation value box.
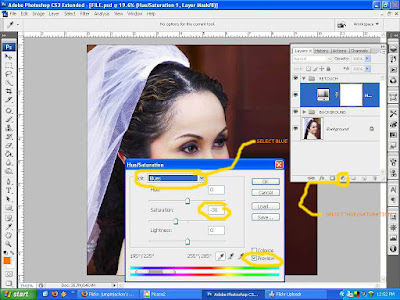 Since the adjustment affected the whole image, we will apply masking. Adjustment layers via the layers pallet automatically add layer mask thumbnail. All we have to do is use the brush tool and make sure the foreground color is black. Carefully brush the veil and adjust brush size and opacity as you go near the edges.
 With the layer mask thumbnail selected, Press/Hold Ctrl+I to invert the masking. Got ya! :)
 Activate the levels layer mask thumbnail by clicking it and then press Ctrl+I on your keyboard to invert from white to black. Choose a white foreground color and carefully brush the areas indicated below. Lessen the opacity and brush size as you go near the lighter part of the shadowed areas.
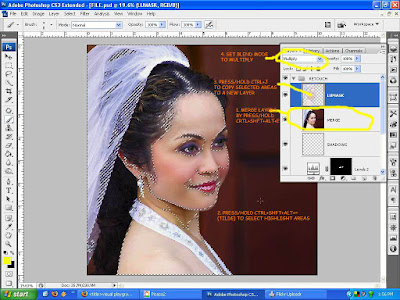
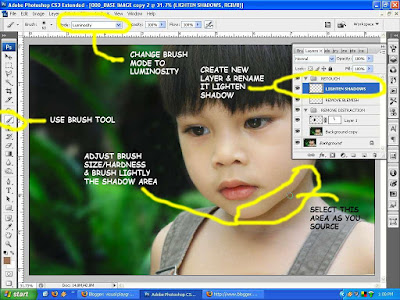
 Create new layer and rename it "Shadows" so you can track your edits. With the brush tool selected, change the brush mode to "Luminosity" and set opacity to 3%. Select your source by Press/Hold Alt key and click the lighter area where you intend to lighten the shadows. Don't overdo the lightening, if you do your image will look dull and flat. Remember shadows are the ones defining the contours making an image three dimensional.
 As I have indicated on the first tutorial, there overexposure on the highlights most specially the foreground shoulder and the gown strap. Do the following steps I provided below.
 Bring out the highlights of the hairs near the nape by using "Shadow/Highlights" from the Image menu>Adjustments options. Change shadow amount as indicated below.
 Mask the surroundings to reveal only the areas we intend to be affected.
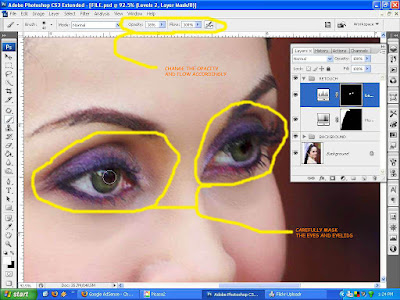
 A light touch of dodge and burn can make the eyes more sultry and captivating.
 Hang on we're almost there. Bump up the contrast by tweaking with curves. Select curves from the "New Adjustment Layer" icon from the layers pallet and drag the diagonal line a tad upwards.
 Now for the last part, choose crop tool and change the values of width and height with 8" & 10" respectively. I like the 4x5 ratio so it is really a personal preference. You can sized to your taste.
 Drag the window selection as shown and move as desired.
 Congratulations! We are done!
 Ciao!
Ciao!
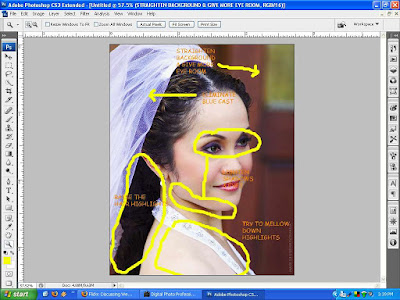
This is the second installment of my two-part series tutorial of "Making a Perfect Photo". On the first part, we made adjustments on the background, stretching it to give eyesight room and popping the subject out.
Today, we will be making subtle retouching on the subject to make the perfect bride photo.
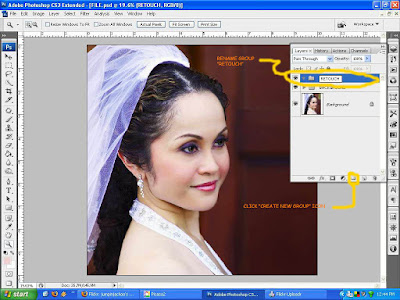
Duplicate your background layer if you have just started on this tutorial. For the people who have been following the series from the beginning, make a new group by clicking the "Create a New Group" icon located at the lower part of the layers pallet. Rename the new group "Retouch".
 We'll start on removing the blue cast on the veil. Select "Hue/Saturation" from the "Create New Fill or Adjustment Layer". On the Hue/Saturation dialog box "Edit" option, click the drop down menu and choose blue. Lower the "Saturation" by dragging the slider to the left or directly input -30 on the saturation value box.
 Since the adjustment affected the whole image, we will apply masking. Adjustment layers via the layers pallet automatically add layer mask thumbnail. All we have to do is use the brush tool and make sure the foreground color is black. Carefully brush the veil and adjust brush size and opacity as you go near the edges.
 With the layer mask thumbnail selected, Press/Hold Ctrl+I to invert the masking. Got ya! :)
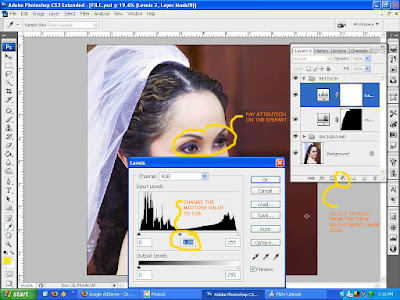
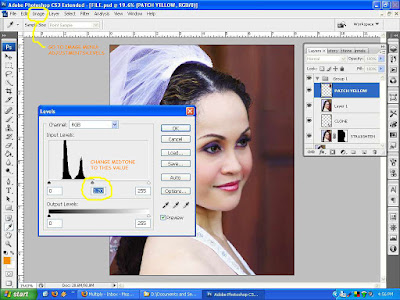
Select "Levels" from the New Adjustment Layer icon and change the midtone value to 1.28 or as desired. Pay attention to the shadowed eye part while changing values and then press "Ok" button.
 Activate the levels layer mask thumbnail by clicking it and then press Ctrl+I on your keyboard to invert from white to black. Choose a white foreground color and carefully brush the areas indicated below. Lessen the opacity and brush size as you go near the lighter part of the shadowed areas.
 Create new layer and rename it "Shadows" so you can track your edits. With the brush tool selected, change the brush mode to "Luminosity" and set opacity to 3%. Select your source by Press/Hold Alt key and click the lighter area where you intend to lighten the shadows. Don't overdo the lightening, if you do your image will look dull and flat. Remember shadows are the ones defining the contours making an image three dimensional.
 As I have indicated on the first tutorial, there overexposure on the highlights most specially the foreground shoulder and the gown strap. Do the following steps I provided below.
 Bring out the highlights of the hairs near the nape by using "Shadow/Highlights" from the Image menu>Adjustments options. Change shadow amount as indicated below.
 Mask the surroundings to reveal only the areas we intend to be affected.
 A light touch of dodge and burn can make the eyes more sultry and captivating.
 Hang on we're almost there. Bump up the contrast by tweaking with curves. Select curves from the "New Adjustment Layer" icon from the layers pallet and drag the diagonal line a tad upwards.
 Now for the last part, choose crop tool and change the values of width and height with 8" & 10" respectively. I like the 4x5 ratio so it is really a personal preference. You can sized to your taste.
 Drag the window selection as shown and move as desired.
 Congratulations! We are done!
 Ciao!
Ciao!Thursday, June 19, 2008
PHOTOSHOP : I. Simple Tutorial on " Making a Perfect Photo"
A few months ago, I was invited to a friend's wedding and this was one of the pictures I took that I really like. Except for the fact that I was shooting down the subject (I was shooting behind and over the shoulder of the official photographer), with a beautiful bride and an excellent natural lighting I felt I cannot do more to improve the image.

I am a member of a group called Critique in Flickr and I submitted this photo for a critique. And found out that there are some editing and adjustments needed to make this a perfect photo.
I'd recommend you to join this group. These guys are sharp and you'll learn A LOT!
To make the story short, here is the discussion made on behalf of this photo and I suggest you read it because this tutorial is based on that.
I made the decision to make this a two part tutorial. This is because I hate long tutorials and also to give you a reason to come back and learn some more. hehe
The first installment will be the adjustments on the background and the latter will be about the final retouch. As with any of my tutorials, this will be a start to finish task.
I encourage you to try to think of improvements and formulate your own solutions.
Let's roll up our sleeves and go to work!
Duplicate your background layer by Press/Hold Ctrl+J or drag the layer to the "Create New Layer" icon below the layers pallet.
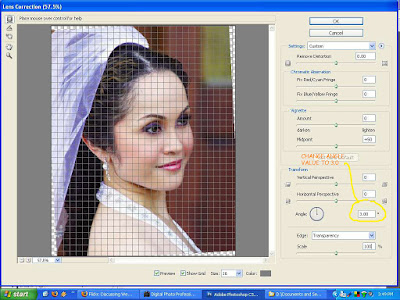
We will fix the background tilt by selecting "Lens Correction" filter from the Filter menu>Distort. A dialog box will appear.
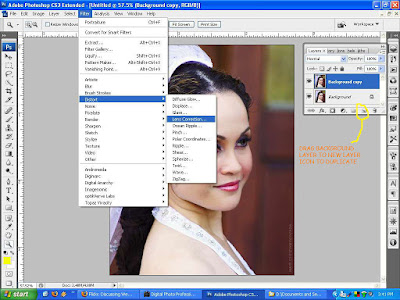
On the Lens Correction dialog box, change the "Angle" value to 3.0 and click Ok button.
We will then mask the subject. Do this by Press/Hold Alt key and click the "Add Layer Mask" icon below the layers pallet. Make sure to select "White" foreground color and use the "Brush" tool. With the "Opacity" set to 100%, carefully brush the background and adjust brush size and hardness as you go near the subject's edges.
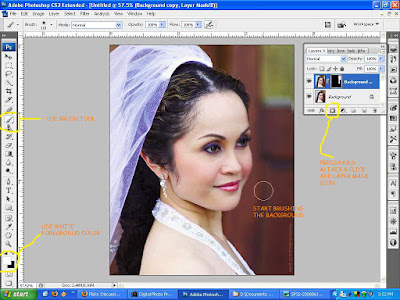
Add a transparent layer by clicking the "Create New Layer" icon on the layers pallet. Clone out whatever excess masking remains. Be sure to set sample to "All Layers" and check the "Align" option.
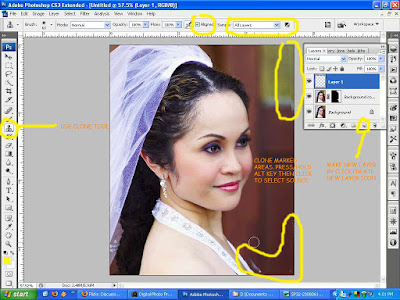
Press/Hold Ctrl+Shft+Alt+E to merge the layers to a new layer. Select the "Rectangular Marguee Tool" or press M, and make a selection on the yellow area to get the right size. Then move selection down to select the source. Copy selection to a new layer by going to Layer menu>New>Layer via Copy or simply Press/Hold Ctrl+J. Drag the copied object to patch the yellow area.
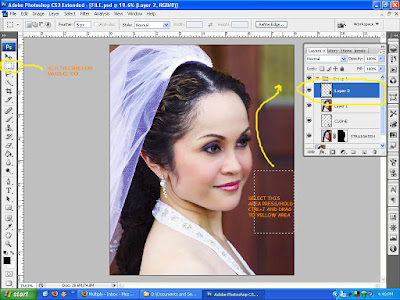 To blend the copied object to the new location, Select "Levels" from the Image menu to localize the adjustment. On the Levels dialog box, set the values as shown.
Mask the edges of the copied object. Make it a habit of grouping and renaming your layers.
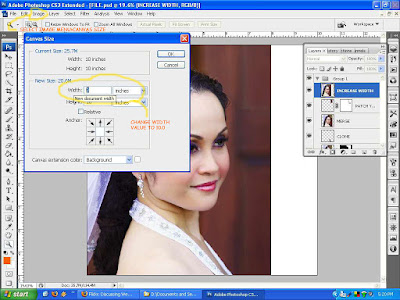
Merge layers by Press/Hold Ctrl+Shft+Alt+E. Select "Canvas Size" from the Image menu and set the width to 10.0 inches.
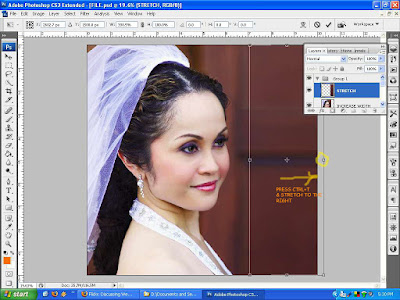
Move the image to the left using "Move Tool" then click and drag. Select "Rectangular Marquee Tool" and make a selection as shown. Press/Hold Ctrl+J to copy the selection to a new layer.

Press/Hold Ctrl+T to "Transform" mode. Click and drag the transform gizmo (as shown) to the right.
To pop out the subject, we will darken the background by using "Levels" on the "Create New Fill or Adjustment Layer" icon below the layers pallet. Change the Shadow and midtone values accordingly.
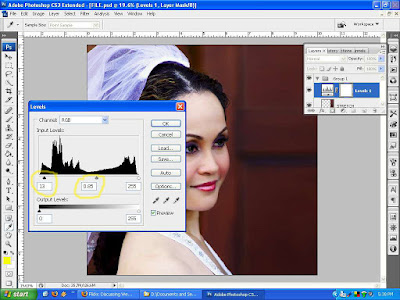
By using Levels via Create New Fill or Adjustment Layer, Photoshop automatically add a mask layer thumbnail. Set foreground color to white and brush carefully the subject to isolate the adjustment only on the background.

Walah! This looks good already.
We will leave the final dimensions after all the editing is done. So don't you go nowhere! :)
P.S.
I took this picture with a entry level Canon 400D DSLR and a cheapo 80-200mm zoom lens that I got from a friend. To people new to photography don't let your camera hinder your creativity. Practice, experiment and learn through reading articles on photography. Afterall your camera is just a tool.
PART II
I am a member of a group called Critique in Flickr and I submitted this photo for a critique. And found out that there are some editing and adjustments needed to make this a perfect photo.
I'd recommend you to join this group. These guys are sharp and you'll learn A LOT!
To make the story short, here is the discussion made on behalf of this photo and I suggest you read it because this tutorial is based on that.
I made the decision to make this a two part tutorial. This is because I hate long tutorials and also to give you a reason to come back and learn some more. hehe
The first installment will be the adjustments on the background and the latter will be about the final retouch. As with any of my tutorials, this will be a start to finish task.
I encourage you to try to think of improvements and formulate your own solutions.

Let's roll up our sleeves and go to work!
Duplicate your background layer by Press/Hold Ctrl+J or drag the layer to the "Create New Layer" icon below the layers pallet.
We will fix the background tilt by selecting "Lens Correction" filter from the Filter menu>Distort. A dialog box will appear.

On the Lens Correction dialog box, change the "Angle" value to 3.0 and click Ok button.

We will then mask the subject. Do this by Press/Hold Alt key and click the "Add Layer Mask" icon below the layers pallet. Make sure to select "White" foreground color and use the "Brush" tool. With the "Opacity" set to 100%, carefully brush the background and adjust brush size and hardness as you go near the subject's edges.

Add a transparent layer by clicking the "Create New Layer" icon on the layers pallet. Clone out whatever excess masking remains. Be sure to set sample to "All Layers" and check the "Align" option.

Press/Hold Ctrl+Shft+Alt+E to merge the layers to a new layer. Select the "Rectangular Marguee Tool" or press M, and make a selection on the yellow area to get the right size. Then move selection down to select the source. Copy selection to a new layer by going to Layer menu>New>Layer via Copy or simply Press/Hold Ctrl+J. Drag the copied object to patch the yellow area.
 To blend the copied object to the new location, Select "Levels" from the Image menu to localize the adjustment. On the Levels dialog box, set the values as shown.
Mask the edges of the copied object. Make it a habit of grouping and renaming your layers.
Merge layers by Press/Hold Ctrl+Shft+Alt+E. Select "Canvas Size" from the Image menu and set the width to 10.0 inches.

Move the image to the left using "Move Tool" then click and drag. Select "Rectangular Marquee Tool" and make a selection as shown. Press/Hold Ctrl+J to copy the selection to a new layer.

Press/Hold Ctrl+T to "Transform" mode. Click and drag the transform gizmo (as shown) to the right.

To pop out the subject, we will darken the background by using "Levels" on the "Create New Fill or Adjustment Layer" icon below the layers pallet. Change the Shadow and midtone values accordingly.

By using Levels via Create New Fill or Adjustment Layer, Photoshop automatically add a mask layer thumbnail. Set foreground color to white and brush carefully the subject to isolate the adjustment only on the background.

Walah! This looks good already.
We will leave the final dimensions after all the editing is done. So don't you go nowhere! :)
P.S.
I took this picture with a entry level Canon 400D DSLR and a cheapo 80-200mm zoom lens that I got from a friend. To people new to photography don't let your camera hinder your creativity. Practice, experiment and learn through reading articles on photography. Afterall your camera is just a tool.
PART II
Sunday, June 8, 2008
PHOTOSHOP : Simple Tutorial on "Retouching an Image"
This is the final installment of my "Three Part Series" tutorial. On the first part, we applied the technique of the Rule of Thirds to improve our composition. On the second part, we made adjustments on level, curves, gaussian blur and made a selective masking to draw out the subject.
In this tutorial, we are going to finalize our image with a little retouching.
As usual, duplicate your background layer by going to Layer Menu>Duplicate Layer or by Press/Hold CTRL+J or you can drag the background layer to the Create New Layer icon on the layer pallet.
Below are some notes on how we are going to do the retouching process. Take time to study and try to formulate your own approach.
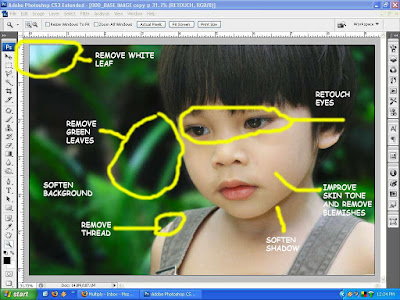 As we go on, allow me to explain to you what we are trying to do.
First, take out the leaves by using the clone tool. Why? Because when you look at the picture, the leaves immediately in the right side of the face draw your eyes out from the subject then leading you to the white leaf then out of the frame.
Using cloning tool, adjust your opacity, hardness and size accordingly. Zoom in when needed and use space bar for panning.
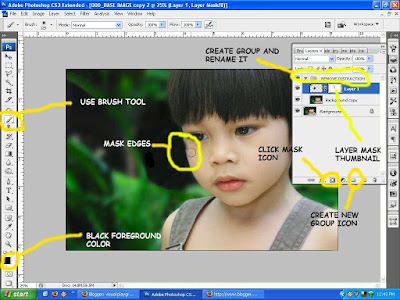
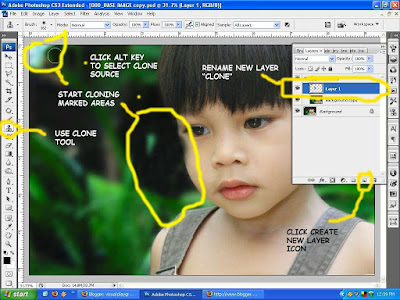 Don't worry if you go beyond the edges, we are going to mask whatever excess cloning remains. (Click here and here for more masking techniques)
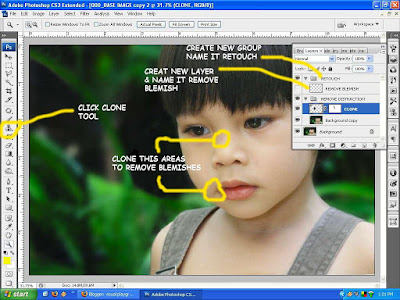
 Create a new layer by clicking the New Layer icon and name it remove blemish. Make it a practice to group and name your edits. That way, you can always go back and reedit when you want to.
Clone all blemishes marked in the picture.
 To make it more natural, lighten the harsh shadow below the jawline. Using Luminosity Blend mode does not affect the color of the image instead, it only affects the tonality of the image by combining the hue and saturation of the base color with the luminance of the blend color. (whatever that is...)
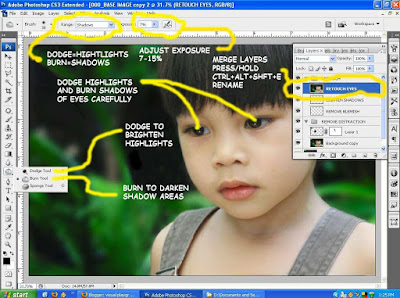
 Widen the catchlights by dodging and burn the dark areas of the eyes to give them a shiny and watery look. Be sparing when using these tools, my suggestion is to limit exposure to 7-15%. And please don't go overboard, make it realistic.
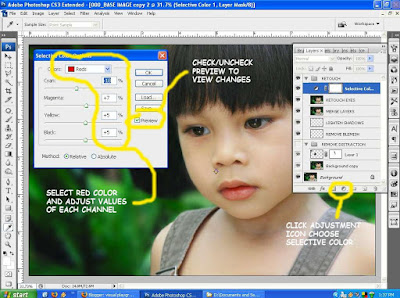
 Use Selective Color to bring back the color of the skin.
 To merge layers into a single layer on top of all layers, Press/Hold CTRL+ALT+SHFT+E on your keyboard. Sharpen the image to show more detail and texture with Unsharp Mask filter and adjust the values that I have set below.
 Now we will soften the whole image by using my favorite tool, High Pass filter. To do so, merge layers, set it to Soft Light mode, invert layer by Press/Hold CTRL+I then go to Filter menu>Others and select High Pass.
 Create new mask and apply radial gradient fill. This is to limit the effect only to the parts we want softened.
 We're done!
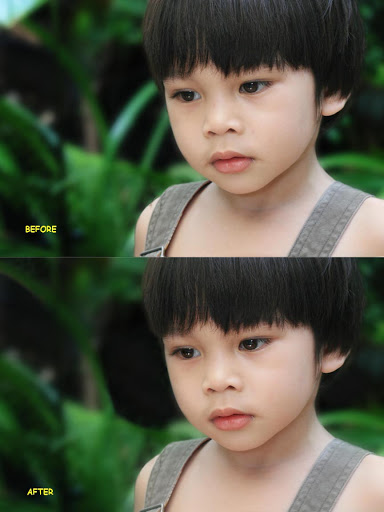 A lot of you, specially to those new to Photoshop, might not notice the difference between the unedited and the finished work.
Let me show you why or how can this be a successful edit so you can understand.
Remember the first tutorial, we placed one of the imaginary intersection on the Rule of Thirds on the left eye of the subject to be the focal point. Retaining a space on the left side of the image, give balance to the whole image.
Removing the leaves is pretty obvious. We want to lessen all distractions as much as possible. We even darkened it to pop the subject out from the background (second tutorial).
The softening or blurring of the surrounding area of the subject gives it a shallower depth of field. And the sharpening helps too in leading the viewers eye to focus on the subject. The idea is to make the viewer glued to the subject.
Try and observe yourself looking both pictures again. Ever wondered why you are drawn to portraits of some great artists? Now you know... :)
Subtle isn't it?
Till next time....
In this tutorial, we are going to finalize our image with a little retouching.
As usual, duplicate your background layer by going to Layer Menu>Duplicate Layer or by Press/Hold CTRL+J or you can drag the background layer to the Create New Layer icon on the layer pallet.
Below are some notes on how we are going to do the retouching process. Take time to study and try to formulate your own approach.
 As we go on, allow me to explain to you what we are trying to do.
First, take out the leaves by using the clone tool. Why? Because when you look at the picture, the leaves immediately in the right side of the face draw your eyes out from the subject then leading you to the white leaf then out of the frame.
Using cloning tool, adjust your opacity, hardness and size accordingly. Zoom in when needed and use space bar for panning.
 Don't worry if you go beyond the edges, we are going to mask whatever excess cloning remains. (Click here and here for more masking techniques)
 Create a new layer by clicking the New Layer icon and name it remove blemish. Make it a practice to group and name your edits. That way, you can always go back and reedit when you want to.
Clone all blemishes marked in the picture.
 To make it more natural, lighten the harsh shadow below the jawline. Using Luminosity Blend mode does not affect the color of the image instead, it only affects the tonality of the image by combining the hue and saturation of the base color with the luminance of the blend color. (whatever that is...)
 Widen the catchlights by dodging and burn the dark areas of the eyes to give them a shiny and watery look. Be sparing when using these tools, my suggestion is to limit exposure to 7-15%. And please don't go overboard, make it realistic.
 Use Selective Color to bring back the color of the skin.
 To merge layers into a single layer on top of all layers, Press/Hold CTRL+ALT+SHFT+E on your keyboard. Sharpen the image to show more detail and texture with Unsharp Mask filter and adjust the values that I have set below.
 Now we will soften the whole image by using my favorite tool, High Pass filter. To do so, merge layers, set it to Soft Light mode, invert layer by Press/Hold CTRL+I then go to Filter menu>Others and select High Pass.
 Create new mask and apply radial gradient fill. This is to limit the effect only to the parts we want softened.
 We're done!A lot of you, specially to those new to Photoshop, might not notice the difference between the unedited and the finished work.
Let me show you why or how can this be a successful edit so you can understand.
Remember the first tutorial, we placed one of the imaginary intersection on the Rule of Thirds on the left eye of the subject to be the focal point. Retaining a space on the left side of the image, give balance to the whole image.
Removing the leaves is pretty obvious. We want to lessen all distractions as much as possible. We even darkened it to pop the subject out from the background (second tutorial).
The softening or blurring of the surrounding area of the subject gives it a shallower depth of field. And the sharpening helps too in leading the viewers eye to focus on the subject. The idea is to make the viewer glued to the subject.
Try and observe yourself looking both pictures again. Ever wondered why you are drawn to portraits of some great artists? Now you know... :)
Subtle isn't it?
Till next time....
Subscribe to:
Posts (Atom)