To all who want to follow my tutorials, you can download the original images and Photoshop PSD files here.
The files are archive using "RAR" format. You can download WinRAR archiver for free if you ever need one.
Tutorials and download links:
1. From A Snapshot To A Great Photo Tutorial
Download here (30MB).
PDF Format here (1.1MB)
Good luck and happy Photoshopping!
Friday, December 12, 2008
Tuesday, December 9, 2008
From A Snapshot To A Great Photo : Stage One
Taking pictures of people and places during street dancing festivals can be very colorful and fun.
We all get very excited clicking here and there, imagining how wonderful the costumes would come out in our pictures, how proud we would be of our prints, how exotic the dancers would look.
All the excitement and hopes soon fade away as soon as we get the prints- unfortunately. This is because we tend to get so caught up in the moment that
in most cases, all we have are snapshots.
Before anything else;
Some of the tools that I have used in this tutorial:
ScreenPrint32 - I used it for screen printing. You can download free for unlimited use on their website.
Rule of Thirds - An action script from PanosFX. Download file and unzip to a folder and rename it as Photoshop Action Script so you can locate it easily for later use. (Check my tutorial on the "Rule of Third" here using this script.
Photoshop shortcut keys:
Ctrl+Alt+Shift+E - Merge visible layers into a separate layer and place it on top of the layer pallete.
[ ]- Reduce or Maximize brush diameter.
Spacebar - Panning.
B - Brush
Ctrl+Shift+I - Inverse selection.
X - Foreground and background color toggle.
This is the original photo I took on the "Pintaflores" street dancing festival last November in San Carlos City Negros, Philippines. I really like this photo, a beautiful dancer with a great costume, an appropriate material for this tutorial.

Now let us take a moment to identify on how to improve this photo.
Exposure - Is a little bit underexposed on the subject's part. If I hadn't been too lazy, I could have snagged the shot. I was in a sort of dilemma at that time if I should bring my external flash. I opted for the beer instead (which is the right thing to do) so I can take pictures with a single hand.:)
Composition - Too centered for my taste and the guy on the left did not help with the overall balance.
Background - Very busy. I could have blurred the background with a shallower DoF but at that time it was blurred enough for me!hic....
The remaining enhancements will be for the next stage of this tutorial just so you'll come back for more.:)
Now let's roll out our sleeves and go to work!
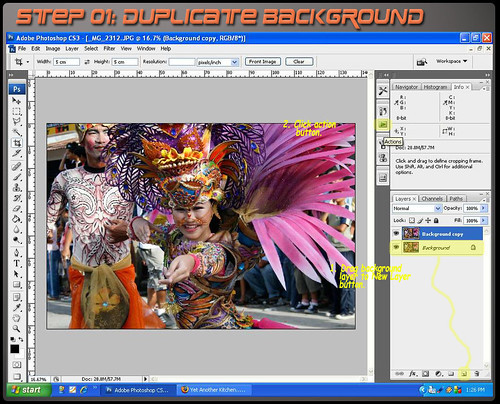
You can download a copy by clicking the image above for use in this tutorial only. Open your Photoshop and remember to duplicate the background by dragging the layer to "Create a new layer" button below the layer pallete or you can press/hold Ctrl+J keys.
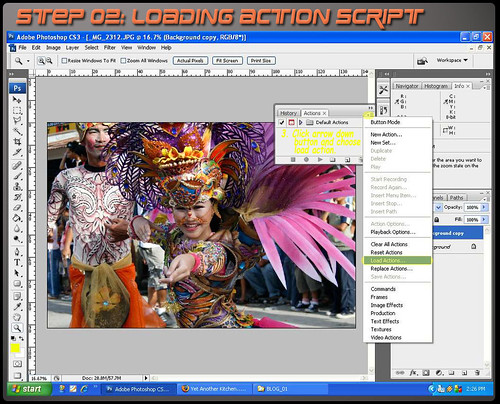
Locate the file "Rule of Thirds Cropping" where you unzipped the action script by pressing the "Load Action" option.
When loaded, highlight the script and press "Play Selection" and wait for the script to run completely until a yellow grid appears.

Rotate grid by click/drag mouse cursor just outside the yellow rectangle and resize by dragging transform toggles on corners and middle sections of the grid. (You can retain the image size ration by press/hold the "Shift" key at the same time.)
When done, read and follow the instructions until the action script is finished.

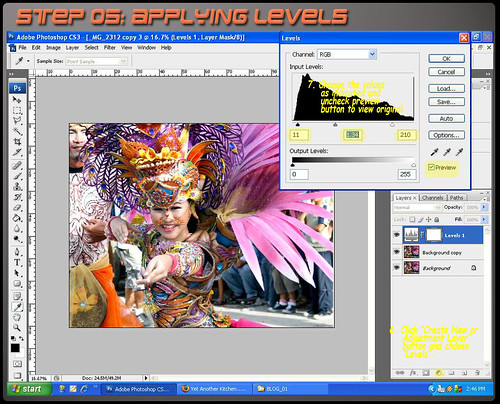
Adjust "Level" values as indicated focusing on the background. Check/Uncheck the preview check box to compare the effect. The purpose of this step is to minimize the effect of the background.
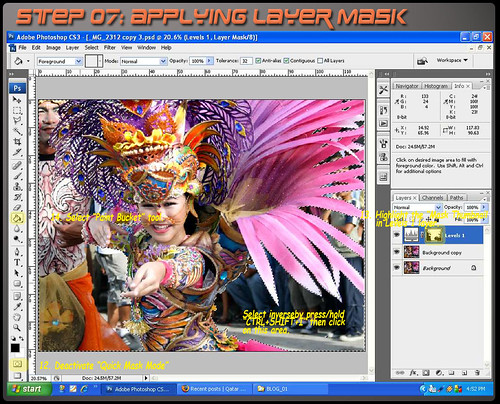
Carefully mask the background using brush in "Quick Mask Mode"and make sure that the foreground color is black.
Do not worry if you go beyond the edges. Just press "X" key to change the foreground to white and brush the excess to erase the mask. This should be a challenge on your masking skills specially on the headress part.

Deactivate "Quick Mask Mode" by clicking the button once. Automatically it will change into a selection. It is a good idea to save the selection by clicking "Select" tab and pick "Save Selection" option. Apply layer mask as shown below.
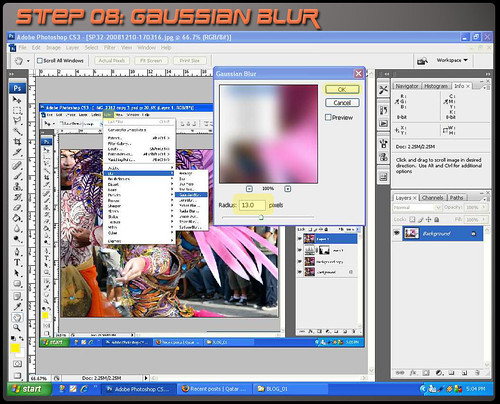
Merge layers by press/hold "Ctrl+Alt+Shit+E" into a separate layer. Then apply gaussian blur to further diminish the background making the subject stand out.
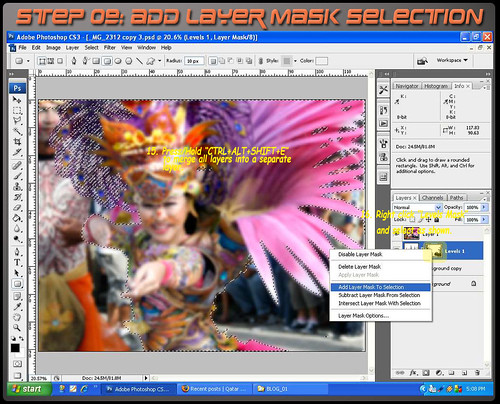
To isolate the effect only on the background, we will apply a layer mask. But first, right click on the "Levels" layer mask thumbnail and select "Add layer mask to selection", highlight the topmost layer and while pressing the "Shit" key, click "Add Vector Mask" at the bottom of the layers pallette.

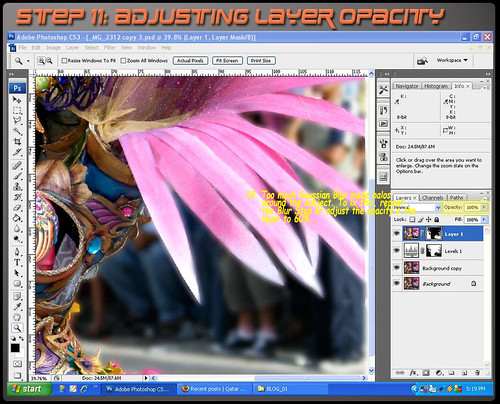
Too much blurring will produce halos at the edges. To fix that we will reduce the opacity of thelayer to minimize the blur effect.
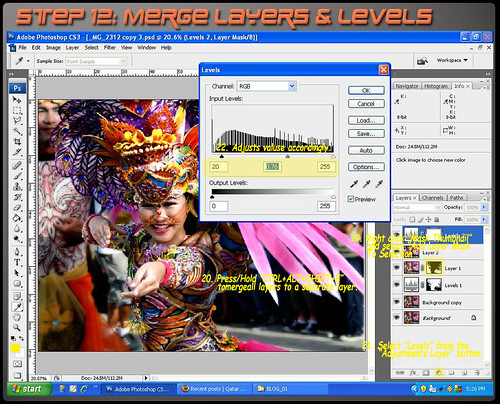
Merge layers, then darken the image by using "Levels" and apply a mask to restrict the effectonly on the background.
Apply "Curves" to enhance the contrast as shown.

There are many ways to sharpen an image. But for this tutorial, we will use the "High Pass" sharpening filter.

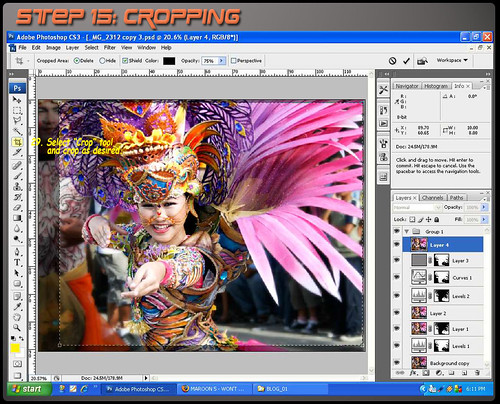
Finally, crop the image as desired. In my case, I prefer the 8 x 10 ratio.
And voila! We are done.

Stay tuned for the Stage Two of this tutorial. Ciao...
We all get very excited clicking here and there, imagining how wonderful the costumes would come out in our pictures, how proud we would be of our prints, how exotic the dancers would look.
All the excitement and hopes soon fade away as soon as we get the prints- unfortunately. This is because we tend to get so caught up in the moment that
in most cases, all we have are snapshots.
Before anything else;
Some of the tools that I have used in this tutorial:
ScreenPrint32 - I used it for screen printing. You can download free for unlimited use on their website.
Rule of Thirds - An action script from PanosFX. Download file and unzip to a folder and rename it as Photoshop Action Script so you can locate it easily for later use. (Check my tutorial on the "Rule of Third" here using this script.
Photoshop shortcut keys:
Ctrl+Alt+Shift+E - Merge visible layers into a separate layer and place it on top of the layer pallete.
[ ]- Reduce or Maximize brush diameter.
Spacebar - Panning.
B - Brush
Ctrl+Shift+I - Inverse selection.
X - Foreground and background color toggle.
This is the original photo I took on the "Pintaflores" street dancing festival last November in San Carlos City Negros, Philippines. I really like this photo, a beautiful dancer with a great costume, an appropriate material for this tutorial.
Now let us take a moment to identify on how to improve this photo.
Exposure - Is a little bit underexposed on the subject's part. If I hadn't been too lazy, I could have snagged the shot. I was in a sort of dilemma at that time if I should bring my external flash. I opted for the beer instead (which is the right thing to do) so I can take pictures with a single hand.:)
Composition - Too centered for my taste and the guy on the left did not help with the overall balance.
Background - Very busy. I could have blurred the background with a shallower DoF but at that time it was blurred enough for me!hic....
The remaining enhancements will be for the next stage of this tutorial just so you'll come back for more.:)
Now let's roll out our sleeves and go to work!
You can download a copy by clicking the image above for use in this tutorial only. Open your Photoshop and remember to duplicate the background by dragging the layer to "Create a new layer" button below the layer pallete or you can press/hold Ctrl+J keys.
Locate the file "Rule of Thirds Cropping" where you unzipped the action script by pressing the "Load Action" option.
When loaded, highlight the script and press "Play Selection" and wait for the script to run completely until a yellow grid appears.
Rotate grid by click/drag mouse cursor just outside the yellow rectangle and resize by dragging transform toggles on corners and middle sections of the grid. (You can retain the image size ration by press/hold the "Shift" key at the same time.)
When done, read and follow the instructions until the action script is finished.
Adjust "Level" values as indicated focusing on the background. Check/Uncheck the preview check box to compare the effect. The purpose of this step is to minimize the effect of the background.
Carefully mask the background using brush in "Quick Mask Mode"and make sure that the foreground color is black.
Do not worry if you go beyond the edges. Just press "X" key to change the foreground to white and brush the excess to erase the mask. This should be a challenge on your masking skills specially on the headress part.
Deactivate "Quick Mask Mode" by clicking the button once. Automatically it will change into a selection. It is a good idea to save the selection by clicking "Select" tab and pick "Save Selection" option. Apply layer mask as shown below.
Merge layers by press/hold "Ctrl+Alt+Shit+E" into a separate layer. Then apply gaussian blur to further diminish the background making the subject stand out.
To isolate the effect only on the background, we will apply a layer mask. But first, right click on the "Levels" layer mask thumbnail and select "Add layer mask to selection", highlight the topmost layer and while pressing the "Shit" key, click "Add Vector Mask" at the bottom of the layers pallette.
Too much blurring will produce halos at the edges. To fix that we will reduce the opacity of thelayer to minimize the blur effect.
Merge layers, then darken the image by using "Levels" and apply a mask to restrict the effectonly on the background.
Apply "Curves" to enhance the contrast as shown.
There are many ways to sharpen an image. But for this tutorial, we will use the "High Pass" sharpening filter.
Finally, crop the image as desired. In my case, I prefer the 8 x 10 ratio.
And voila! We are done.
Stay tuned for the Stage Two of this tutorial. Ciao...
Friday, July 4, 2008
Adobe Camera Raw 4.4 and Lightroom 1.4
List of cameras supported by Adobe Photoshop Camera Raw 4.4
Canon :
EOS-1D
EOS-1Ds
EOS-1D Mark II
EOS 1D Mark II N
EOS-1Ds Mark II
EOS-1D Mark III
EOS-1Ds Mark III
EOS 10D
EOS 20D
EOS 20Da
EOS 30D
EOS 40D
EOS 5D
EOS D30
EOS D60
EOS 300D (Digital Rebel/Kiss Digital)
EOS Rebel XT (EOS 350D/EOS Kiss Digital N)
EOS 400D (Rebel XTi/EOS Kiss Digital X)
EOS 450D (Digital Rebel XSi/EOS Kiss X2)
PowerShot 600
PowerShot A5
PowerShot A50
PowerShot Pro 1
PowerShot S30
PowerShot S40
PowerShot S45
PowerShot S50
PowerShot S60
PowerShot S70
PowerShot G1
PowerShot G2
PowerShot G3
PowerShot G5
PowerShot G6
PowerShot G9
PowerShot Pro70
PowerShot Pro90 IS
Contax :
N Digital
Epson :
R-D1
R-D1s
Fujifilm :
FinePix E900
FinePix F700
FinePix IS-1
FinePix S100 FS
FinePix S2 Pro
FinePix S5 Pro
FinePix S3 Pro
FinePix S20 Pro
FinePix S5000 Z
FinePix S5200/5600
FinePix S6000fd/S6500fd
FinePix S7000 Z
FinePix S9000/9500
FinePix S9100/9600
Kodak :
DCS 14n
DCS Pro 14nx
DCS720x
DCS760
DCS Pro SLR/n
EasyShare P712
EasyShare P850
EasyShare P880
Konica Minolta :
Alpha Sweet Digital (Japan)
Alpha-5 Digital (China)
DiMAGE A1
DiMAGE A2
DiMAGE A200
DiMAGE 5
DiMAGE 7
DiMAGE 7i
DiMAGE 7Hi
Maxxum Dynax 5D (Europe)
Maxxum 5D (USA)
Maxxum 7D/Dynax 7D
Leaf :
Aptus 17
Aptus 22
Aptus 54s
Aptus 65
Aptus 75
Aptus 75s
Valeo 6
Valeo 11
Valeo 17
Valeo 22
Leica :
D-Lux 2
D-Lux 3
Digilux 2
Digilux 3
V-LUX 1
Mamiya :
ZD
Nikon :
D1
D1H
D1X
D100
D200
D2H
D2Hs
D2X
D2Xs
D3
D300
D40
D40x
D50
D60
D70
D70s
D80
Coolpix 5000
Coolpix 5400
Coolpix 5700
Coolpix 8400
Coolpix 8700
Coolpix 8800
Olympus :
E-1
E-3
E-10
E-20
EVOLT E-300
EVOLT E 330
EVOLT E-400
EVOLT E-500
EVOLT E-510
C-5050 Zoom
C-5060 Zoom
C-7070 Wide Zoom
C-8080 Wide Zoom
SP-310
SP-320
SP-350
SP-570 UZ
E-410
SP-500UZ
SP-510 UZ
SP-550 UZ
SP-560 UZ
Panasonic :
DMC-FZ30
DMC-FZ50
DMC-L1
DMC-LC1
DMC-L10
DMC-LX1
DMC-LX2
Lumix DMC-FZ8
Pentax :
*ist D
*ist DL
*ist DL2
*ist DS
*ist DS2s
K10D (PEF)
K100D
K100D Super
K110D
K20D (PEF)
K200D (PEF)
Phase One :
H 20
H 25
P 20
P 20+
P 21
P 21+
P 25
P25+
P 30
P 30+
P 45
P 45+
Samsung :
GX 1S
GX-1L
Sigma :
SD9
SD10
SD14
Sony :
DSC-F828
DSC-V3
DSC-R1
A100
A700
Source : Adobe Site
Wednesday, June 25, 2008
PHOTOSHOP : Opinions needed...
If it were up to you, how would you improve the image?
Retouching will be based on your critique. Feel free to leave comments.
P.S.
Courteousness and politeness is very much appreciated. Don't leave ugly comments directed against the subject. Be friendly. :)
Retouching will be based on your critique. Feel free to leave comments.

P.S.
Courteousness and politeness is very much appreciated. Don't leave ugly comments directed against the subject. Be friendly. :)
Subscribe to:
Posts (Atom)