In this tutorial, we are going to finalize our image with a little retouching.
As usual, duplicate your background layer by going to Layer Menu>Duplicate Layer or by Press/Hold CTRL+J or you can drag the background layer to the Create New Layer icon on the layer pallet.
Below are some notes on how we are going to do the retouching process. Take time to study and try to formulate your own approach.
 As we go on, allow me to explain to you what we are trying to do.
First, take out the leaves by using the clone tool. Why? Because when you look at the picture, the leaves immediately in the right side of the face draw your eyes out from the subject then leading you to the white leaf then out of the frame.
Using cloning tool, adjust your opacity, hardness and size accordingly. Zoom in when needed and use space bar for panning.
 Don't worry if you go beyond the edges, we are going to mask whatever excess cloning remains. (Click here and here for more masking techniques)
 Create a new layer by clicking the New Layer icon and name it remove blemish. Make it a practice to group and name your edits. That way, you can always go back and reedit when you want to.
Clone all blemishes marked in the picture.
 To make it more natural, lighten the harsh shadow below the jawline. Using Luminosity Blend mode does not affect the color of the image instead, it only affects the tonality of the image by combining the hue and saturation of the base color with the luminance of the blend color. (whatever that is...)
 Widen the catchlights by dodging and burn the dark areas of the eyes to give them a shiny and watery look. Be sparing when using these tools, my suggestion is to limit exposure to 7-15%. And please don't go overboard, make it realistic.
 Use Selective Color to bring back the color of the skin.
 To merge layers into a single layer on top of all layers, Press/Hold CTRL+ALT+SHFT+E on your keyboard. Sharpen the image to show more detail and texture with Unsharp Mask filter and adjust the values that I have set below.
 Now we will soften the whole image by using my favorite tool, High Pass filter. To do so, merge layers, set it to Soft Light mode, invert layer by Press/Hold CTRL+I then go to Filter menu>Others and select High Pass.
 Create new mask and apply radial gradient fill. This is to limit the effect only to the parts we want softened.
 We're done!
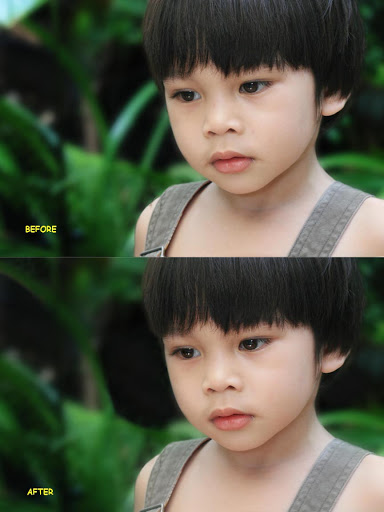 A lot of you, specially to those new to Photoshop, might not notice the difference between the unedited and the finished work.
Let me show you why or how can this be a successful edit so you can understand.
Remember the first tutorial, we placed one of the imaginary intersection on the Rule of Thirds on the left eye of the subject to be the focal point. Retaining a space on the left side of the image, give balance to the whole image.
Removing the leaves is pretty obvious. We want to lessen all distractions as much as possible. We even darkened it to pop the subject out from the background (second tutorial).
The softening or blurring of the surrounding area of the subject gives it a shallower depth of field. And the sharpening helps too in leading the viewers eye to focus on the subject. The idea is to make the viewer glued to the subject.
Try and observe yourself looking both pictures again. Ever wondered why you are drawn to portraits of some great artists? Now you know... :)
Subtle isn't it?
Till next time....
1 comment:
bro give me some samples on photoshop which only the picture remove a paste to another with no background including....
like i wanna paste my picture with no background to the other picture then short of inserting to it. Parang kasali na ako sa picture na wala ako parang ganon..
and some tricks to adjust/edit picture.
thanks in advance
Post a Comment