
I am a member of a group called Critique in Flickr and I submitted this photo for a critique. And found out that there are some editing and adjustments needed to make this a perfect photo.
I'd recommend you to join this group. These guys are sharp and you'll learn A LOT!
To make the story short, here is the discussion made on behalf of this photo and I suggest you read it because this tutorial is based on that.
I made the decision to make this a two part tutorial. This is because I hate long tutorials and also to give you a reason to come back and learn some more. hehe
The first installment will be the adjustments on the background and the latter will be about the final retouch. As with any of my tutorials, this will be a start to finish task.
I encourage you to try to think of improvements and formulate your own solutions.
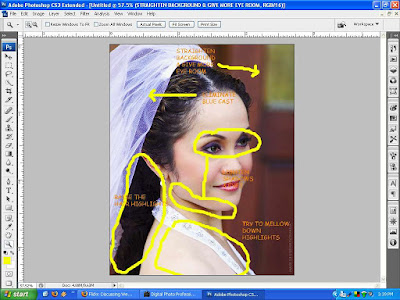
Let's roll up our sleeves and go to work!
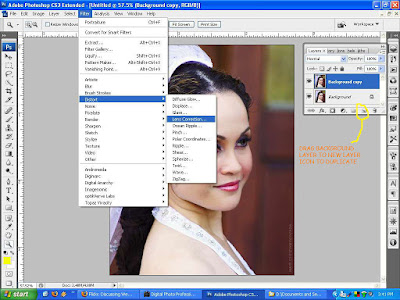
Duplicate your background layer by Press/Hold Ctrl+J or drag the layer to the "Create New Layer" icon below the layers pallet.
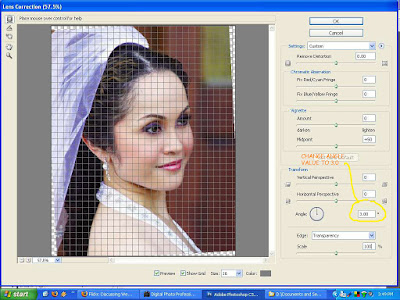
We will fix the background tilt by selecting "Lens Correction" filter from the Filter menu>Distort. A dialog box will appear.
On the Lens Correction dialog box, change the "Angle" value to 3.0 and click Ok button.
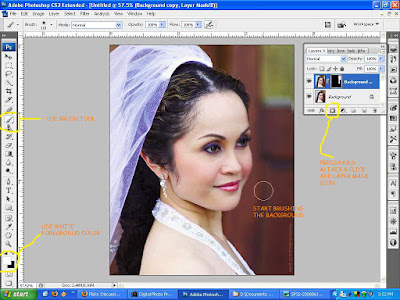
We will then mask the subject. Do this by Press/Hold Alt key and click the "Add Layer Mask" icon below the layers pallet. Make sure to select "White" foreground color and use the "Brush" tool. With the "Opacity" set to 100%, carefully brush the background and adjust brush size and hardness as you go near the subject's edges.
Add a transparent layer by clicking the "Create New Layer" icon on the layers pallet. Clone out whatever excess masking remains. Be sure to set sample to "All Layers" and check the "Align" option.
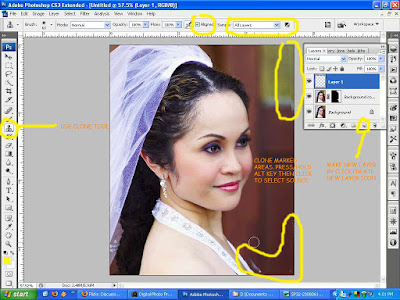
Press/Hold Ctrl+Shft+Alt+E to merge the layers to a new layer. Select the "Rectangular Marguee Tool" or press M, and make a selection on the yellow area to get the right size. Then move selection down to select the source. Copy selection to a new layer by going to Layer menu>New>Layer via Copy or simply Press/Hold Ctrl+J. Drag the copied object to patch the yellow area.
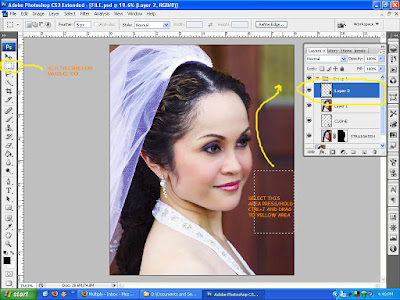 To blend the copied object to the new location, Select "Levels" from the Image menu to localize the adjustment. On the Levels dialog box, set the values as shown.
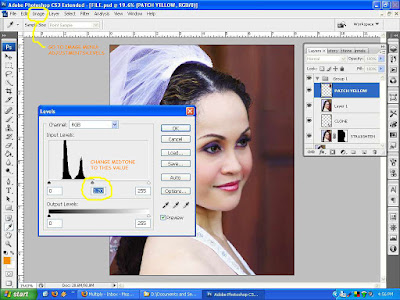
Mask the edges of the copied object. Make it a habit of grouping and renaming your layers.
Merge layers by Press/Hold Ctrl+Shft+Alt+E. Select "Canvas Size" from the Image menu and set the width to 10.0 inches.
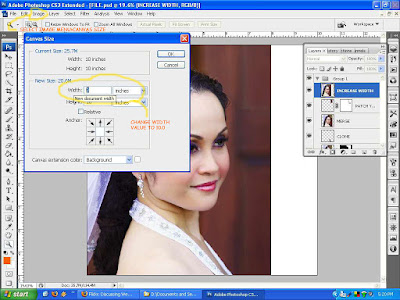
Move the image to the left using "Move Tool" then click and drag. Select "Rectangular Marquee Tool" and make a selection as shown. Press/Hold Ctrl+J to copy the selection to a new layer.
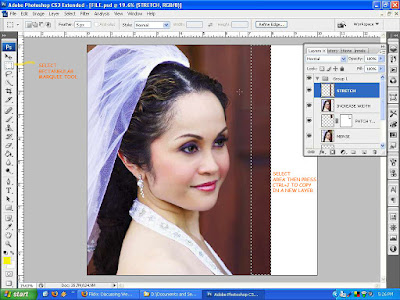
Press/Hold Ctrl+T to "Transform" mode. Click and drag the transform gizmo (as shown) to the right.
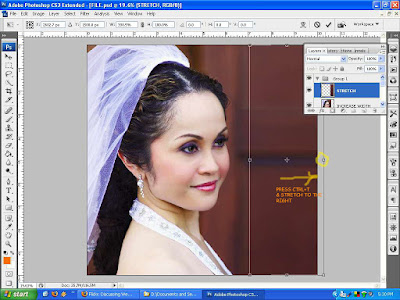
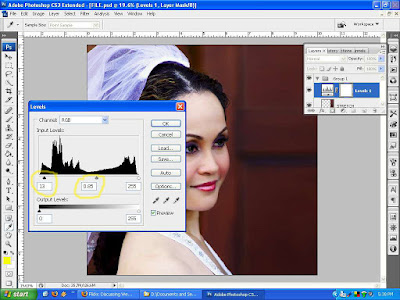
To pop out the subject, we will darken the background by using "Levels" on the "Create New Fill or Adjustment Layer" icon below the layers pallet. Change the Shadow and midtone values accordingly.
By using Levels via Create New Fill or Adjustment Layer, Photoshop automatically add a mask layer thumbnail. Set foreground color to white and brush carefully the subject to isolate the adjustment only on the background.
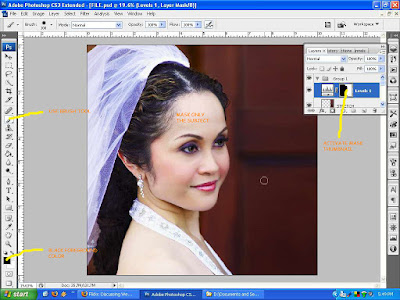
Walah! This looks good already.
We will leave the final dimensions after all the editing is done. So don't you go nowhere! :)
P.S.
I took this picture with a entry level Canon 400D DSLR and a cheapo 80-200mm zoom lens that I got from a friend. To people new to photography don't let your camera hinder your creativity. Practice, experiment and learn through reading articles on photography. Afterall your camera is just a tool.
PART II
8 comments:
Very nice!
i'll wait for the next tutorial! =]
hello, can i link you in my page
Sure!Everybody is free to link my site.
Good Tutorial! It was chosen for the main page of http://www.tutorialsroom.com
Please submit all of your future quality tutorials in there.
hey thanks!
I learned more through the Flickr Critique site and your tut than I have in the past 6 mos! Thank you!
..wow nice tutorial huh,...
thank you for the info you have
given!
i'l keep u posted!
Hello, I do not agree with the previous commentator - not so simple
Post a Comment