Retouching will be based on your critique. Feel free to leave comments.

P.S.
Courteousness and politeness is very much appreciated. Don't leave ugly comments directed against the subject. Be friendly. :)
 We'll start on removing the blue cast on the veil. Select "Hue/Saturation" from the "Create New Fill or Adjustment Layer". On the Hue/Saturation dialog box "Edit" option, click the drop down menu and choose blue. Lower the "Saturation" by dragging the slider to the left or directly input -30 on the saturation value box.
 Since the adjustment affected the whole image, we will apply masking. Adjustment layers via the layers pallet automatically add layer mask thumbnail. All we have to do is use the brush tool and make sure the foreground color is black. Carefully brush the veil and adjust brush size and opacity as you go near the edges.
 With the layer mask thumbnail selected, Press/Hold Ctrl+I to invert the masking. Got ya! :)
 Activate the levels layer mask thumbnail by clicking it and then press Ctrl+I on your keyboard to invert from white to black. Choose a white foreground color and carefully brush the areas indicated below. Lessen the opacity and brush size as you go near the lighter part of the shadowed areas.
 Create new layer and rename it "Shadows" so you can track your edits. With the brush tool selected, change the brush mode to "Luminosity" and set opacity to 3%. Select your source by Press/Hold Alt key and click the lighter area where you intend to lighten the shadows. Don't overdo the lightening, if you do your image will look dull and flat. Remember shadows are the ones defining the contours making an image three dimensional.
 As I have indicated on the first tutorial, there overexposure on the highlights most specially the foreground shoulder and the gown strap. Do the following steps I provided below.
 Bring out the highlights of the hairs near the nape by using "Shadow/Highlights" from the Image menu>Adjustments options. Change shadow amount as indicated below.
 Mask the surroundings to reveal only the areas we intend to be affected.
 A light touch of dodge and burn can make the eyes more sultry and captivating.
 Hang on we're almost there. Bump up the contrast by tweaking with curves. Select curves from the "New Adjustment Layer" icon from the layers pallet and drag the diagonal line a tad upwards.
 Now for the last part, choose crop tool and change the values of width and height with 8" & 10" respectively. I like the 4x5 ratio so it is really a personal preference. You can sized to your taste.
 Drag the window selection as shown and move as desired.
 Congratulations! We are done!
 Ciao!
Ciao!


 To blend the copied object to the new location, Select "Levels" from the Image menu to localize the adjustment. On the Levels dialog box, set the values as shown.


 As we go on, allow me to explain to you what we are trying to do.
 Don't worry if you go beyond the edges, we are going to mask whatever excess cloning remains. (Click here and here for more masking techniques)
 Create a new layer by clicking the New Layer icon and name it remove blemish. Make it a practice to group and name your edits. That way, you can always go back and reedit when you want to.
 To make it more natural, lighten the harsh shadow below the jawline. Using Luminosity Blend mode does not affect the color of the image instead, it only affects the tonality of the image by combining the hue and saturation of the base color with the luminance of the blend color. (whatever that is...)
 Widen the catchlights by dodging and burn the dark areas of the eyes to give them a shiny and watery look. Be sparing when using these tools, my suggestion is to limit exposure to 7-15%. And please don't go overboard, make it realistic.
 Use Selective Color to bring back the color of the skin.
 To merge layers into a single layer on top of all layers, Press/Hold CTRL+ALT+SHFT+E on your keyboard. Sharpen the image to show more detail and texture with Unsharp Mask filter and adjust the values that I have set below.
 Now we will soften the whole image by using my favorite tool, High Pass filter. To do so, merge layers, set it to Soft Light mode, invert layer by Press/Hold CTRL+I then go to Filter menu>Others and select High Pass.
 Create new mask and apply radial gradient fill. This is to limit the effect only to the parts we want softened.
 We're done!
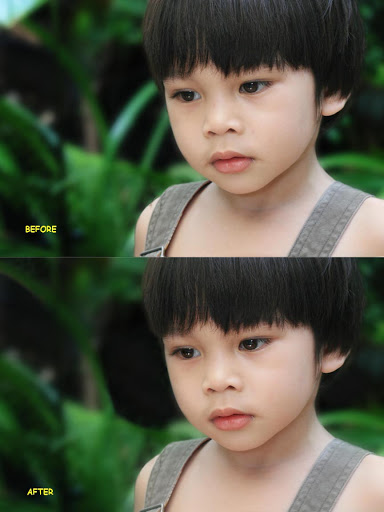 A lot of you, specially to those new to Photoshop, might not notice the difference between the unedited and the finished work.
 Oooh. The water is more clearer removing the glare/reflection present in the original. The rocks look wetter! But we do have overblown highlights on the water and the background tree leaves. We'll keep that in mind.
 I like it even better. You can basically see the bottom of the stream. Hmmm. Again, it overblown the highlights and made the shadows more darker.
 We have now more contrast on the tree leaves and a more defined waterfall near the trees but made the rest of our image darker.


 And we are done!
 As usual we duplicate our image by going to Layer menu>Duplicate Layer or by dragging the background layer to the new layer icon below the Layers Pallet or simply press and hold Ctrl key then press J on your keyboard.
 When you have duplicated your layer, let us darken our image by using Levels adjustment. Click "Create New Fill/Adjustment Layer" icon below the Layers Pallet and select "Levels".
 In the "Levels" dialog box, we will adjust the "black/shadow and the gray/midtone slider". Adjust the black slider first then the gray slider. Sliding to the right will intensify shadow areas darkening the image, sliding to the left will do the opposite. While adjusting the sliders concentrate on the background not the subject. This is a matter of personal preference on how much you would want your subject to pop out of the image.
 If you ever made a mistake or gone overboard, don't worry, just place the black slider full left and the gray slider in the middle. Alternatively, you can press and hold "Alt" key and click reset on the "Levels" dialog box.
 Carefully brush the subject starting from the center. As you brush towards the edges, you may want to adjust your brush size and uhmmm hardness.
 Take a break and congratulate yourself for going this far. While having you're coffee break, you may want to click the Adobe icon somewhere on this page, and buy yourself a copy of Photoshop CS3.
 In the Gaussian Blur dialog box, move slider to the desired effect focusing on the background then click "Ok" button. Like in the "Levels" dialog box, you can always reset the effect by Press/Hold "Alt" key and click "Reset".
 To apply our selection to a mask, first change foreground color to white, activate our Blur Layer then click "Add Layer Mask". A new layer mask will appear on our Blur Layer that looks like the previous mask.
 Asses the result. If you think you blurred it too much, lessen the effect by decreasing the "Opacity" of our Blur Layer.
 We're almost there. Boost the highlights contrast of our image by applying curves. Click "Create New Fill/Adjustment Layer" located at the bottom of the Layers Pallet and select "Curves". In the "Curves" dialog, click at the center of the diagonal line and drag it upwards.

 Hope you have fun with this tutorial.