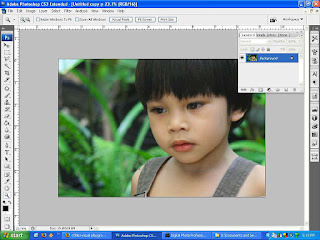
This is an overview on what tools we are going to use in this tutorial:
1. Levels
2. Masking
3. Gaussian Blur
4. Curves
These are very simple tools and a standard approach used in photo editing. A good foundation for beginners. Let's roll up our sleeves and go to work!
To start, I will use the same image in the previous tutorial, so you can see the progress of my workflow.
 As usual we duplicate our image by going to Layer menu>Duplicate Layer or by dragging the background layer to the new layer icon below the Layers Pallet or simply press and hold Ctrl key then press J on your keyboard.
 When you have duplicated your layer, let us darken our image by using Levels adjustment. Click "Create New Fill/Adjustment Layer" icon below the Layers Pallet and select "Levels".
 In the "Levels" dialog box, we will adjust the "black/shadow and the gray/midtone slider". Adjust the black slider first then the gray slider. Sliding to the right will intensify shadow areas darkening the image, sliding to the left will do the opposite. While adjusting the sliders concentrate on the background not the subject. This is a matter of personal preference on how much you would want your subject to pop out of the image.
 If you ever made a mistake or gone overboard, don't worry, just place the black slider full left and the gray slider in the middle. Alternatively, you can press and hold "Alt" key and click reset on the "Levels" dialog box.
Our "Levels" adjustment were applied to the whole image. Because all we want is to darken the background we will apply a mask to our subject. As you can see in the Levels layer (image above), photoshop has already made a layer mask for us (the white thumbnail).
Choose brush, set foreground color to black, and activate the layer mask thumbnail. To adjust the brush size and hardness, right click on the image and move the sliders.
 Carefully brush the subject starting from the center. As you brush towards the edges, you may want to adjust your brush size and uhmmm hardness.
Sometimes accidents do happen and in your case, more often. If you ever made a mistake of brushing beyond the subjects edges, go back and start all over again from scratch.
Got ya! To fix the mistake, just set foreground color to white and brush the affected area. When done, set the foreground color to black and continue masking. Remember to adjust your brush size and hardness if needed.
 Take a break and congratulate yourself for going this far. While having you're coffee break, you may want to click the Adobe icon somewhere on this page, and buy yourself a copy of Photoshop CS3.
That was quick...
Now we will apply a "Gussian Blur" to give it a, well, a blurred look. We have to merge our layers first. Press and hold Ctrl+Shift+Alt and press E. A new layer will appear on top of our Layers pallet. It is a good practice to name your layers so you'll know what effect you applied on a particular layer.
Go to Filter menu> Blur> select Gaussian Blur.
 In the Gaussian Blur dialog box, move slider to the desired effect focusing on the background then click "Ok" button. Like in the "Levels" dialog box, you can always reset the effect by Press/Hold "Alt" key and click "Reset".
We have to mask our subject again to apply the effect only in the background. Instead of doing it, again, we will use our mask that we made previously. Activate the Layer Mask thumbnail and right click. Select "Add Layer Mask to Selection", marching ants will then appear. No kidding. The moving broken lines are called marching ants.
 To apply our selection to a mask, first change foreground color to white, activate our Blur Layer then click "Add Layer Mask". A new layer mask will appear on our Blur Layer that looks like the previous mask.
 Asses the result. If you think you blurred it too much, lessen the effect by decreasing the "Opacity" of our Blur Layer.
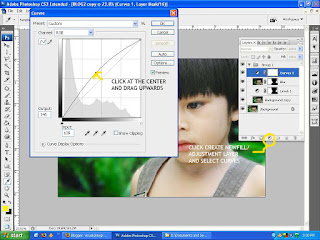
 We're almost there. Boost the highlights contrast of our image by applying curves. Click "Create New Fill/Adjustment Layer" located at the bottom of the Layers Pallet and select "Curves". In the "Curves" dialog, click at the center of the diagonal line and drag it upwards.
Click of "Ok" button and we're done!
Show it to your wife and brag what you can do to all your photos so you can justify your purchase of Photoshop CS3...:)
SUMMARY
1. We started with this raw photo.
1. We started with this raw photo.


1 comment:
looked better before ;)
Post a Comment